Oak Desk Project: Part Two *Desk*
Yesterday (Saturday 21st) was spent labeling each piece of wood and identifying which sides would be facing out and up, and which pieces would be routed, as well as which pieces would be inside, etc. Used a half a roll of painter's tape and scratched a new bald spot on my head trying to get the jigsaw puzzle together all the while keeping the Quality Assurance rep satisfied with my decisions. It's a tough job, but someone has to do it, right?
Today, we started assembling the desk. The shell is, for the most part, complete. Tomorrow the fun begins with making the drawers, cutting and adding the trim, and hopefully have the drawer facings all ready for when the pulls arrive sometime Tuesday.


More fun coming tomorrow. And although you can't see the dogs, trust me they were out there following me around every single step of the way! Now you know why I call it "Dustpuppy Designs". :)
Day 2
Do you know Murphy. I sure do!
Here's a lesson for anyone daring to "square off" (the four outside corners, for example) your project using a right angle square. You're better off cutting spacers to fit the "EXACT" dimension FIRST (i.e. edge of desktop with an outside vertical piece) , then square off. Otherwise, you'll find yourself in deep doo doo when your squared edge is off by, oh, 1/2" on the opposing end. Which happened to me, today, costing me valuable time spent on correcting it. When I went to take measurements for the left side drawers, I discovered this very problem. Unfortunately, I had plugged all the pocket holes earlier today, and I had to drill them out. GAH! (shakes fist at Murphy)


Day 3
Today (Tuesday 24th) started off with a quick completion of varnish for a shelf (Sherry performed this task while I contemplated how thick or thin I was going to trim out the desk facings. I decided on 3/8" for the lower desk and 3/4" for the desktop. The tricky part was getting the facings for the paper tray to be slotted. I actually had to route these manually because my portable router table didn't exceed 7" and the largest piece of trim was over 28". I cut all trim and facings by hand, I did not buy ready made moulding.


Today, we started assembling the desk. The shell is, for the most part, complete. Tomorrow the fun begins with making the drawers, cutting and adding the trim, and hopefully have the drawer facings all ready for when the pulls arrive sometime Tuesday.

Left front, where the CPU is stationed.

From the backside.

Shelf above the CPU.

Without the flash!

I set a screened tent up outside the shop to do my staining and varnishing. Pretty handy! Anyways, the slotted paper shelves on the right side are shown here.

The whole tent.

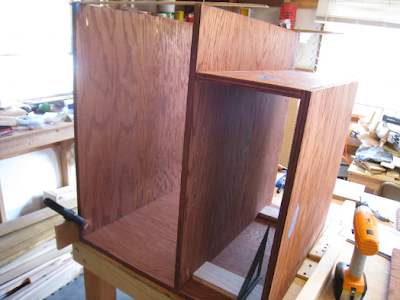
Learning from my past mistakes using the pocket hole jig, it's important to keep those edges tight. This is the start of the desk's right side.

The sides go up.

Full view minus the flash.

Different angle.

Adding the bottom shelf.

Paper tray and paper drawer area.

The backside.

Whoa! I forgot to take pictures of the desktop being added, but here is a shot of it attached.

Without the flash.

Paper trays cut and added. 1/2" finger holes drilled for easy pull-out.

Backside. Is it level? Yep!

Quality Assurance (QA) suggested I clean the bench clutter and take another picture. Notice the keyboard tray slides at bottom center?

The "money" shot. I stood up on a chair to take this picture, I hope OSHA doesn't read this, lol!
More fun coming tomorrow. And although you can't see the dogs, trust me they were out there following me around every single step of the way! Now you know why I call it "Dustpuppy Designs". :)
Day 2
Do you know Murphy. I sure do!
Here's a lesson for anyone daring to "square off" (the four outside corners, for example) your project using a right angle square. You're better off cutting spacers to fit the "EXACT" dimension FIRST (i.e. edge of desktop with an outside vertical piece) , then square off. Otherwise, you'll find yourself in deep doo doo when your squared edge is off by, oh, 1/2" on the opposing end. Which happened to me, today, costing me valuable time spent on correcting it. When I went to take measurements for the left side drawers, I discovered this very problem. Unfortunately, I had plugged all the pocket holes earlier today, and I had to drill them out. GAH! (shakes fist at Murphy)

Pocket hole plugs come too long, so I made a jig to help me shorten them. (One at a time)

Oak pocket hole plugs cut and now stained.

Back pieces cut and drilled.

Paper trays stained.

Back pieces stained.

The casters came today.

Back pieces added. What you don't see is that the entire inside of the desk has been varnished. I did that before adding the backing.

Better lighting.

CPU shelf varnished and laminated. Far end is the paper tray backing, stained.

The boo boo corrected (note square at bottom right).
Day 3
Today (Tuesday 24th) started off with a quick completion of varnish for a shelf (Sherry performed this task while I contemplated how thick or thin I was going to trim out the desk facings. I decided on 3/8" for the lower desk and 3/4" for the desktop. The tricky part was getting the facings for the paper tray to be slotted. I actually had to route these manually because my portable router table didn't exceed 7" and the largest piece of trim was over 28". I cut all trim and facings by hand, I did not buy ready made moulding.

It looks nice.

Are you asking yourself, "What are these for?" Because the moulding was 1/16" of inch larger than the 3/4" plywood, I had to cut some lauan to extend the drawer slides past the lip so that the drawers would fit on the slides. Yes, 1/16" makes a world of difference for a drawer slide.

I'm starting to feel the love, baby!

Paper trays that slide. Just rub the sides with wax once in a while.

CPU station.

I need a new trash box, because this is running over, haha!
Day 4

First drawer. Should hold plenty of reams of paper.

Second drawer and the realization I need more birch plywood. Off to Mr. Plywood's.

3rd drawer installed.

A little trick for drawers bottoms.

Dust orbs (using flash) and 4th drawer installed.

All 5 drawers installed.

Open sesame, and the keyboard tray is installed.

From an angle.

Today, the drawer facings and pulls get done.


Comments
Post a Comment